It’s pretty self explanatory from the pictures shown above.
Just shape the pillsbury biscuits to look like a donut. Spray the air fryer tray and the donuts with some pam spray. Bake it at 375 for 6 to 8 minutes. Make the donut glaze by combining icing sugar with a little milk or cream. Spread the glaze all over donuts and it’s time to DECORATE!!!! 😀
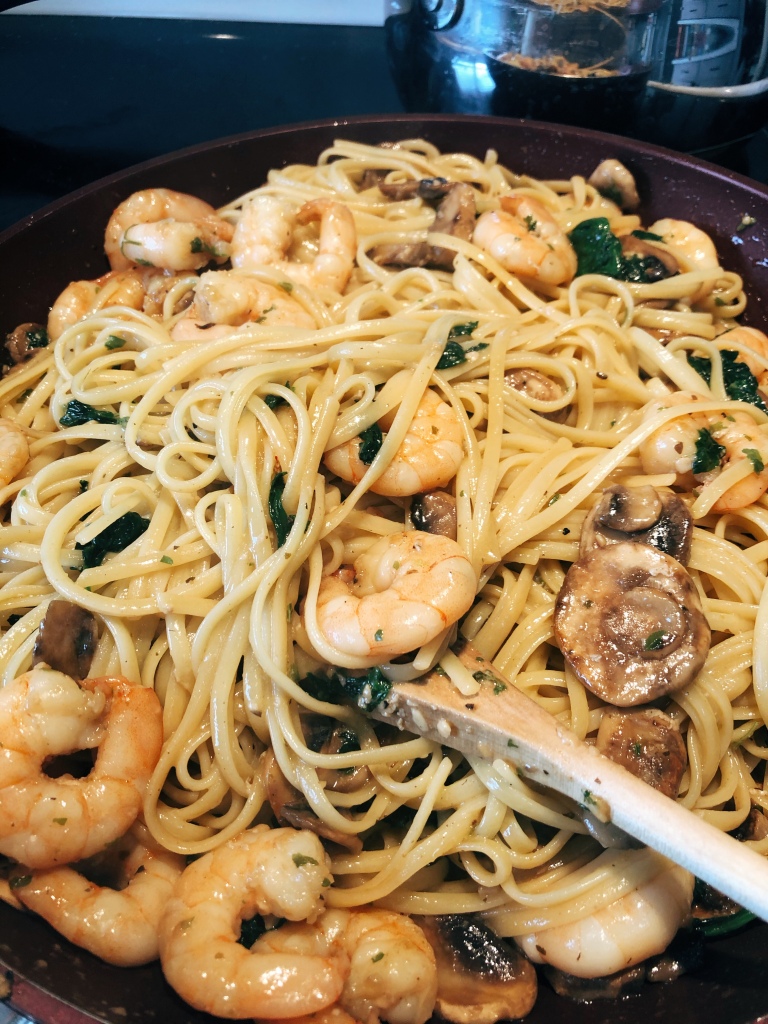
ALL COOKED IN JUST 1 PAN!! LITERALLY A LIFESAVER FOR A WORKING MOM!
Because I love seafood and because I have so many freezers lol (2 big deep chest freezers and 2 fridge freezers!!), I always always have plenty of frozen shrimps. So when I am lacking in inspiration and simply do not feel like cooking or washing a lot of dishes, one pan dishes like this one is really appealing.
It’s a super easy recipe and you can use black pepper instead of white pepper. But I love love love white pepper so I use it in everything. Minced garlic is a must and be generous with it. It’s really what makes this pasta so yummy.
Ingredients:
Linguine (enough for 6 servings)
2 tablespoons oil
1 stick butter cut in half
Lots of Minced Garlic
3 Tbsp Cajun Spice
Large shrimps
Fresh Mushrooms
Salt and White pepper
Spinach
Instructions:
Boil water in the big pan and add pasta. Once cooked, drain pasta and place aside for now
Using same pan, heat oil and half of your butter. Add garlic and cook until garlic is slightly brown but not burnt
Add in shrimp, mushroom, cajun spice, salt and white pepper to taste, and stirfry until shrimp and mushroom are cooked
Add spinach
Return cooked pasta to the pan and add remaining butter.
I still remember the first time i packed a kaya sandwich in Ryan’s packed lunch to daycare. When I went to pick him up, the awesome daycare ladies asked me what was the green stuff in his sandwich 😛 . They probably wondered why any mom would slather green food coloring to their kid’s sandwich LOL.
So, Kaya is a Southeast Asia jam that basically consist of eggs, coconut cream, sugar and Pandan Essence. Pandan Essence is made from Pandan leaves which is in abundance in Singapore. Not so much in where we live in Canada. So next best thing – I brought back Pandan Paste and Pandan extract 😀 . I mean…what’s a girl gonna do to get her favorite jam fix? 😉
Pandan Paste Vs. Pandan Extract
Pandan Leaves
For those of you who do not know what Pandan Leaves are like, they are a tropical plant that grows abundantly in Southeast Asia. You can read more about the plant at thespruceeats.com if you like but it is known as a “fragrant plant” because of its unique, sweet aroma and growing up, my mom uses it fairly often for baking. It’s got such a sweet and fragrant aroma i love just sniffing the bottle LOL. And Kaya Sandwich is to me like how PB&J sandwich is to my Caucasian friends 😀 . Well, until now where every kid’s packed lunch has to be nut free anyway.
Traditional Kaya Jam takes at least a couple hours to make. It is really a very easy recipe with less than 5 ingredients. Challenge is it requires a lot of patience slaving over the stove using a double boiler to cook it slowly, making sure you stir it constantly over low heat. The patience is what makes good kaya jam smooth instead of lumpy. Well, I like to think I have many virtues but patience is not always one of them
So I decided to use the same ingredients as I would in a traditional recipe. Except that instead of a double boiler, I just cook it in a pot directly over stove on low to medium heat. Took way lesser time to get it to a jam kinda texture. Sure, it wasn’t as smooth but it didn’t affect the taste one bit. In fact, it taste every bit the same ❤ ❤ ❤ ❤ ❤ as I remember growing up eating that for breakfast made by my adorable mom.. I wonder if Ryan thinks I’m adorable too lol.. probably not 😀 . What matters is he loves his kaya toast as much as I do & that’s a win for a lazy mommy trying to integrate him to his Singapore roots.
Best way to eat it – spread margarine and kaya on your toast 😀
Ingredients:
5 large eggs, lightly beaten
1 cup white sugar
1 cup coconut cream (full fat version please)
1/2 tablespoon Pandan Essence
Instructions:
Add sugar, coconut cream & essence to the lightly beaten eggs in a pot
Cook the mixture directly on stove over low to medium heat
Keep stirring constantly until it becomes the jam texture you are looking for
When it is cooled, you can store in fridge just like you keep your store bought strawberry jam
Honestly, never even really occurred to me where egg tarts actually come from… as in from which culture. Growing up, I always remember eating them when my parents would bring us to go eat dim sum on weekend mornings. Those were very fond memories indeed. These days, you can pretty much eat dim sum any day.
But this I do know – while it is a Asian dish, it has influences from the Portuguese. Might be the reason why some Asian places call them Portuguese Egg Tarts.
So usually, I will try to make my own crust and I have a really wicked awesome flaky pie crust which I feel will work great for the egg tarts but this weekend, Ryan and I weren’t feeling really well so I just really didn’t feel like making it from scratch so store bought ones will have to do for this weekend 😀
And really, Tenderflake Tart Shells works perfect with Egg Tarts.
There are many many egg tart recipes but remembering that this is a Easy Peasy one, so I did skip some steps such as straining the egg mixture. Straining the egg mixture/filling helps remove any lumps and ensures your custard filling comes out looking smooth & pretty.
Also, it usually ask you to chill the filling in fridge first. Again, skipped by this mommy. One thing to note too that my original recipe usually uses evaporated milk but sometimes when I dun have that, I use my coffee cream instead. I just use 2 tbsp of coffee cream instead of 1/4 cup evaporated milk.
Since I am baking for my family and not to sell, I really could care less about straining it. Maybe when I have more time or when I decide to see if anyone will buy it from me at the Farmers Market lol
Here goes the super easy ingredients:
1 box of Tenderflake Tart Shells (12 tarts)
4 beaten eggs with a pinch of vanilla extract & salt
¾ cup hot water
6 tablespoons sugar
1/4 cup evaporated milk
My Easy Peasy Lazy Mommy Recipe:
To make the custard filling, stir in sugar in hot water and let it cool slightly
Once water is cooled, add in your beaten eggs, vanilla, salt and evaporated milk. If you don’t have evaporated milk, I would just add 2 Tbsp of coffee cream or half & half
Mix it all up thoroughly
Strain it if you want your custard to look smooth and pretty and without lumps but I didn’t.
Pour it into the 12 tart shells till about 80% full
Bake at 400 f for 20-25 mins. Mine came out at 25 mins Cos I filled the tart shells to the brim lol. But if you fill it to 80% full, 20 mins works suffice
And that is it. Super easy. Super lazy recipe. And now my son gets to have a taste of what my parents would bring me to eat on a Sunday morning 😀 and he ate 2 for breakfast this morning so I’m gonna call that a Mommy Win!
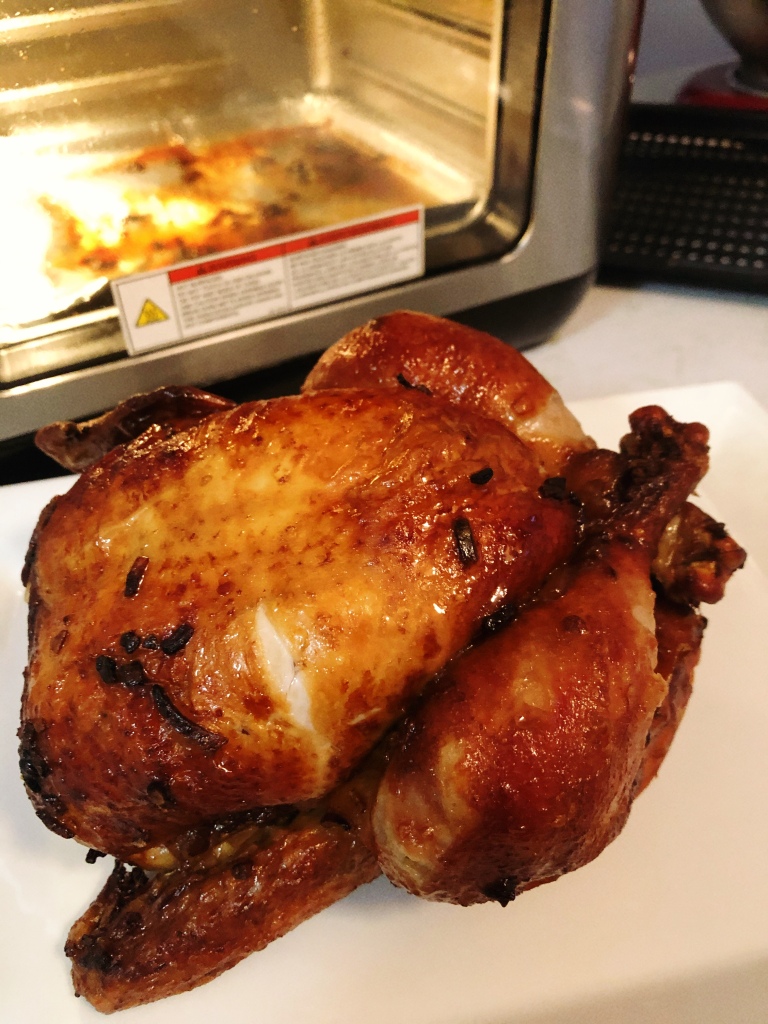
I have always disliked making a whole Chicken. Despite my best friend telling me it’s the easiest thing she does in her home, I still don’t like making it. But the few times that I have made a whole Chicken, I have done it using our oven and I always either undercook or overcook the chicken to death 😀
But it was so easy to use my Vortex Plus to do this that I am pretty certain that this is going to start being a Regular in our household. And for whatever reason, Vortex Plus just makes me feel like a little girl who just got an Easy Bake Oven toy as a present LOL.
I must have somewhat feel intimidated about using it cos hubby got this for me as a Christmas gift and while I have used it to make Chicken Wings (which are fabulous by the way) and cookies, I haven’t touched the Rotisserie function at all.
Well, let me assure you that my initial fear is definitely unwarranted. The rotisserie function is so easy peasy to use. If a Lazy Mommy like me can use it and succeed on her first try, so can you 😀
This Bad Ass Vortex Plus is definitely not going anywhere!!! I love it! 🙂
When I have the time, I would make my own seasoning for the chicken but a mom’s gonna do what she’s gonna do and sometimes, there just isn’t enough time in a day to get everything done – well, not for me anyway cos you know, Netflix is important too for my sanity LOL…so ermmmm definitely no shame in using shortcuts lol
So a few lazy mommy tips for this recipe. To save time, I use onion soup mix as my dry rub for the chicken. Also, I know every recipe always calls for adding the food after the oven has been pre-heated but honestly, I don’t find it such a significant difference for some dishes so I just skip that part and just add the food. For the Vortex Plus, the 40 mins only starts after it’s been pre-heated anyway. Another thing – if you are concerned about if the chicken is fully cooked, temp of fully cooked chicken breast is 165 and cooked thigh meat should be 185. But 40 mins definitely did it for my 3 pound chicken. It was cooked fully but also super moist.
Ingredients:
Whole Chicken (must be Under 4 Pounds. I used a 3 pound bird)
1 Packet of Onion Soup Mix
3 Tbsp Melted Butter
Dash of white pepper
Dash of black pepper
Instructions:
In a small bowl, combine the onion soup mix with the melted butter
Pat the chicken dry & make sure the cavity of chicken is clean. Remove any gizzards & tie the chicken with kitchen string. I was lazy and just bought a chicken that was already tied up.
Rub the onion soup mix seasoning all around the whole chicken, including the cavity
Everyone does it differently. For me, I find it easier to insert the left rotisserie fork to the rotisserie rod first. Then I insert the rod through the chicken cavity. Lastly, I insert the right fork to the rod and Ta Da! It is now ready to go into the Vortex Plus (dun be intimidated by my written instructions. Just watch the video. I promise you the video shows how i do it and it’s actually quite easy)
Some users wait till the Vortex Plus is pre-heated before adding the chicken. I honestly just add the chicken right in, close the door before I start pre-heating the Vortex Plus. I find no significant difference in it but you do what you prefer 😀
40 minutes at 375 F and I eagerly remove my chicken. Yum!
To ensure you get a super moist chicken, rest the chicken for 10 minutes. This is important.
Enjoy! 😀
Enjoy the video & let me know how it turns out for you or share with me your favorite Roast Chicken recipe!
All I know is that my son, my hubby & grandpa all gave this Roast Chicken the Thumbs Up! 😎 😎 😎 That make this Lazy Mommy soooo very happy
Haven’t touched my blog for almost a month. We been gone for a long holiday back to Singapore to see family. And while the weather there is summer 365 days of the year, coming back to -12 frosty weather hasn’t felt very easy. To top that off, the hacking cough or cold I got before I flew back probably got worse after being stuck in a long haul flight (over 27 hours) with my toddler :-(.
Anyhow, last Saturday was the first weekend since we got back. I have every intention to leave the house but looking out the window & feeling like I am gonna cough my lungs out, staying home watching cartoons with my toddler sounds sooooo much cosier
See What I Mean..
And what better than to make than a dump everything in Slow Cooker Chicken Soup.
Dump everything in Slow Cooker Chicken Soup
Our garden carrots, celery, onion, chicken broth, chicken breasts & not forgetting ginger cos Asians put ginger in everything lol. Jokes aside, ginger is loaded with nutrients & always makes me feel better when I have a cold. Dump everything in Slow Cooker on low for 6 hours and Off we are back to the couch with our blanket!
So there we go….Cartoons, Snuggles, Blanket, Couch, Hot Chicken Soup & Video Chat with Grandma was all we could handle 😀
Roll prepared dough out on a clean floured surface
Spread melted butter all over the rolled out dough
Sprinkle generously the brown sugar all over
Tightly roll dough up. I cut away the two corner sides
Slice them into 6 rolls
Place cinnamon rolls in a greased baking pan. (I use a square pan)
Cover with towel and let rise again for 60 mins
Preheat oven to 350 degrees F. Remove towel and bake cinnamon rolls for 20-25 minutes or until just slightly golden brown on the edges. Mine took 20 minutes. You want to underbake them a little so they stay soft in the middle, that’s why we want them just slightly golden brown
I have never like frosting on my Cinnamon Buns so this is good enough for me and my family
While waiting for the dough to rise, I thought why not use part of the dough to bake something else and see if it works out & Ta Da! That’s how these Cinnamon Buns were born as well 😀
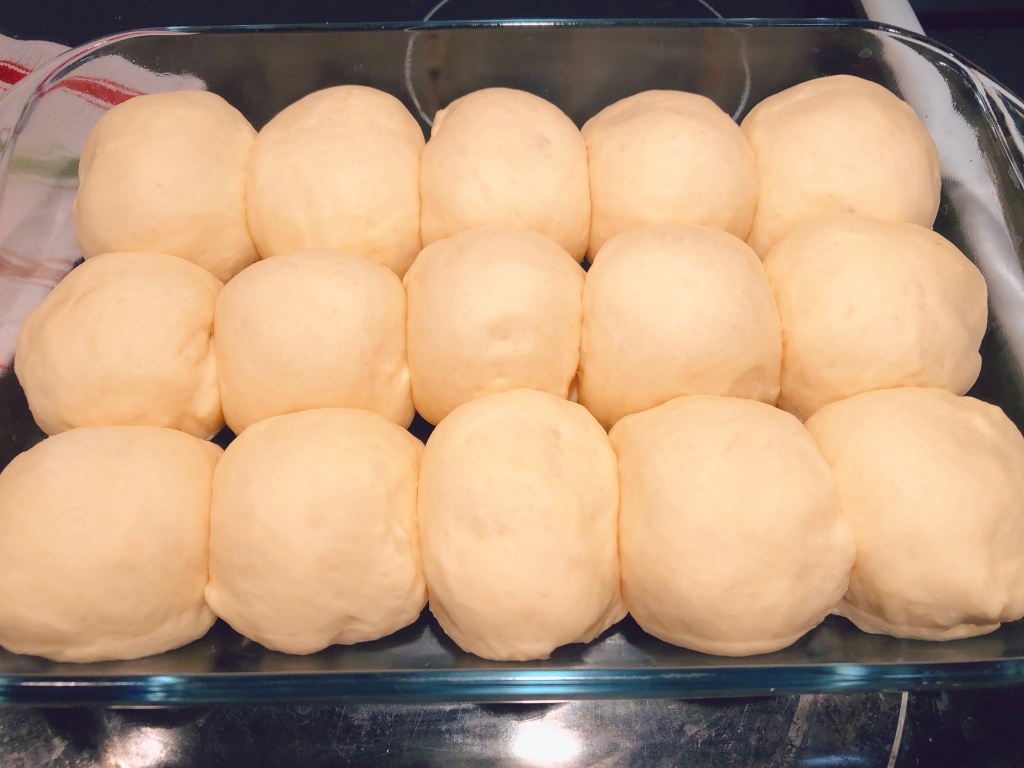
But meanwhile, let’s take a look at how these Easy Peasy Dinner Rolls are made 😀
Ingredients:
2 cups warm milk
2 tablespoons instant dry yeast
1/4 cup white sugar
1 teaspoons salt
6 tablespoons salted butter softened
2 large eggs
6 cups all-purpose flour
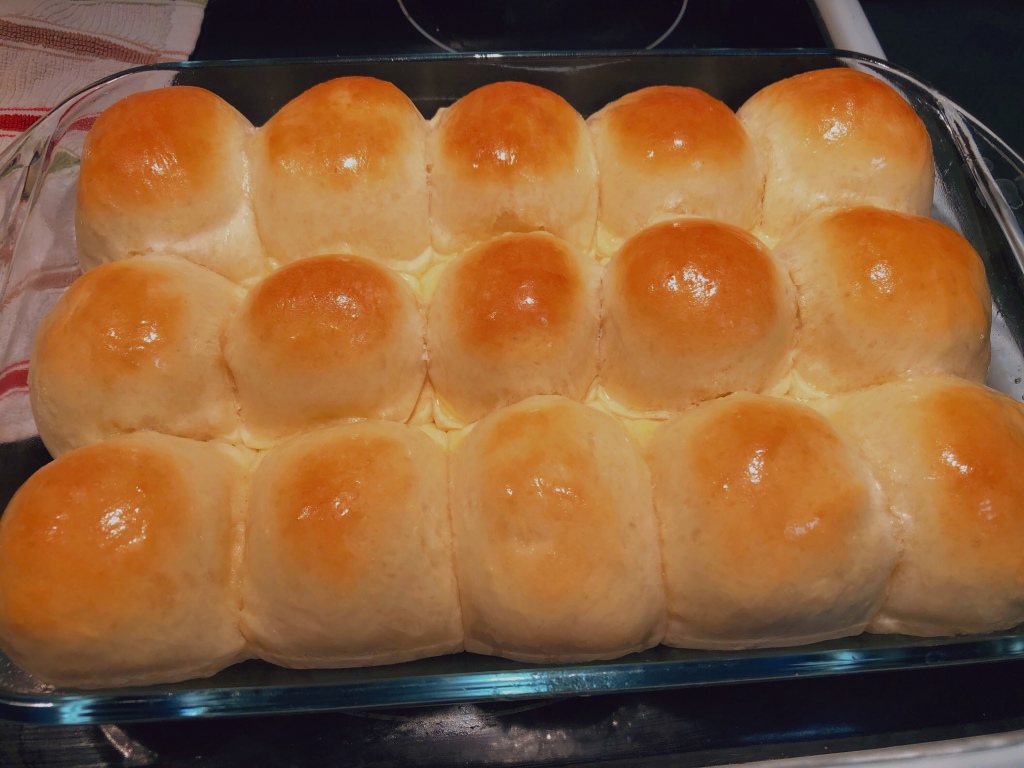
1 tablespoon melted butter to brush the buns after they are out of oven
Instructions:
In my mixer bowl with a dough hook, dump warm milk, yeast, sugar, salt, butter, and eggs in this order
Add in 6 cups of flour, turn mixer on to a low speed. Once the flour starts to incorporate into the dough, increase to medium speed
Mix until the dough pulls away from the sides of the bowl. The dough mixture should be slightly sticky and soft
Add more or less flour until the dough reaches the desired consistency. I find 6 cups work perfect for me
Transfer the dough to a lightly greased big mixing bowl. Cover with a towel and let rise 90 minutes
Do a happy dance when you see it rise after 90 minutes 😀
Punch down the dough and form into 15 equal sized rolls. You can use a food scale but I just estimate it by feel
Place on a greased baking tray with space between each roll. Cover and let rise 1 hour
Preheat oven to 375 degrees. Bake the rolls for 12 to 14 minutes, until lightly browned.
Remove rolls from oven and brush with melted butter. Serve the rolls warm or if you are making them the night before like I was, let them cool down first before storing in a zip lock bag
NOTES:
This recipe easily makes 24 rolls but I saved a portion of the dough to make Cinnamon Buns so I only made 15 rolls but if you plan to use the whole dough, divide them into 24 rolls. If you are interested in the Cinnamon Bun recipe, you can click them here
I made this the night before our Thanksgiving Dinner & just make sure the buns get cooled down before storing it in a ziplock bag
Dinner rolls always taste best when they are warm and fresh out from oven but sometimes, it isn’t possible to bake them just before the big dinner so no worry. They taste good on its own the next day or microwave it for 5-10 seconds before you eat them and they are good 😀
We love meatballs! No doubt about that so when I was thinking on how to incorporate more veggies in our meals (because this family just really loves munching on salads & feeling like a rabbit lol), it just make so much sense to make meatballs with lots of veggies.
And it’s perfect for crunch time since these meatballs freeze so well. I usually make a huge batch on weekend and use it on really busy weekday evenings that I don’t have enough time to make our dinner from scratch.
Use it to make spaghetti with meatballs or make a meatball sub. Really, whatever u can think of will work with these babies 😀
Now, my recipe might incorporate veggies but if you practice clean eating, this probably isn’t the recipe for you but if like me, you want a somewhat healthier meatballs but still wanna do it the Lazy Mommy way, then u might like this recipe!
So it really is as easy as it can be.
Ingredients:
2 packs of Ground Turkey
2 Eggs
Panko Crumbs
Shredded Veggies (I use 1 medium Zucchini and threw a bit of carrot I still had in the fridge)
2 packets Onion Soup mix
Yes! You read that right! 😀
Like I said earlier, this recipe isn’t for you if you want super clean eating and no sodium.
I just mix everything together. With any kind of meatballs, you never want to over mix or the texture of the cooked meatballs will be pretty yucky.
Bake in preheated 400 degree for 25 mins. If you like small meatballs, reduce it to 20 mins
There you go – this Lazy Mommy Easy Peasy meatballs 😀
Egg Plant is not unfamiliar to me. Actually in Asia, we call them Brinjal and my UK friends call them Aubergine. Either way, they are all the same thing 😀
In Asia when I grew up in, my mom cooked egg plant quite a fair bit but I have never liked it. It was like a stew kinda egg plant dish. My first few memories of the dish is that it is mushy and looks gross lol
But by chance through Ryan’s babysitter, she told me about this egg plant recipe and boy do I love it. I mean what is there not to love about it?
It’s delicious
It’s healthy
Ryan loves it
And it’s so easy to make
I first made this dish when Ryan was like 12 months old. If you making it for a younger baby, you could increase the baking time to make it even softer but with Ryan past 2 years old now, baking it at 350 for 25 minutes makes it soft enough but not so mushy that Ryan can still pick it up like a piece of pizza
There are other versions of making this dish that involves baking the egg plant once first before baking it a 2nd time with the sauce and cheese. This mommy just wants to minimize the cooking time as much as possible so here goes 😀
How to cook "with visual instructions" "using familiar ingredients from your local grocery stores" healthy, traditional and delicious Japanese dishes!!
................... for lovers of ice cream. Your free on line magazine for sweet frozen treats. Recipes, inspiration, artisanal ideas for your delectation.