Happy 55th Birthday Singapore

August is a month of many birthdays, starting with my mom’s birthday, followed by my nephew followed by Singapore Birthday! And this year, Singapore is turning 55!! HOO HOO!

Last month, we celebrated Canada Day with a chocolate cake so I was cracking my brains on what to do for Singapore Day that I could involve Ryan too. Turned to Pinterest but everything look more complicated than the level of energy I had lol. While I love creating indoor activities with Ryan, my criteria is that it can’t take too much time to assemble it. Otherwise, I be tired even before he starts the activity.

I know I know! We sing Happy Birthday for every occasion we can think of lol

Took a look at my pantry. TA DA!! I have Frozen Toaster Strudels!! Yeah to frozen convenience food lol.

They will do. They are rectangular in shape and will make do as a flag Ha! I am so impressed with myself lol especially since I just forgot to pick my son up from daycare last week. Turns out most mommies have done that before lol but I digress.

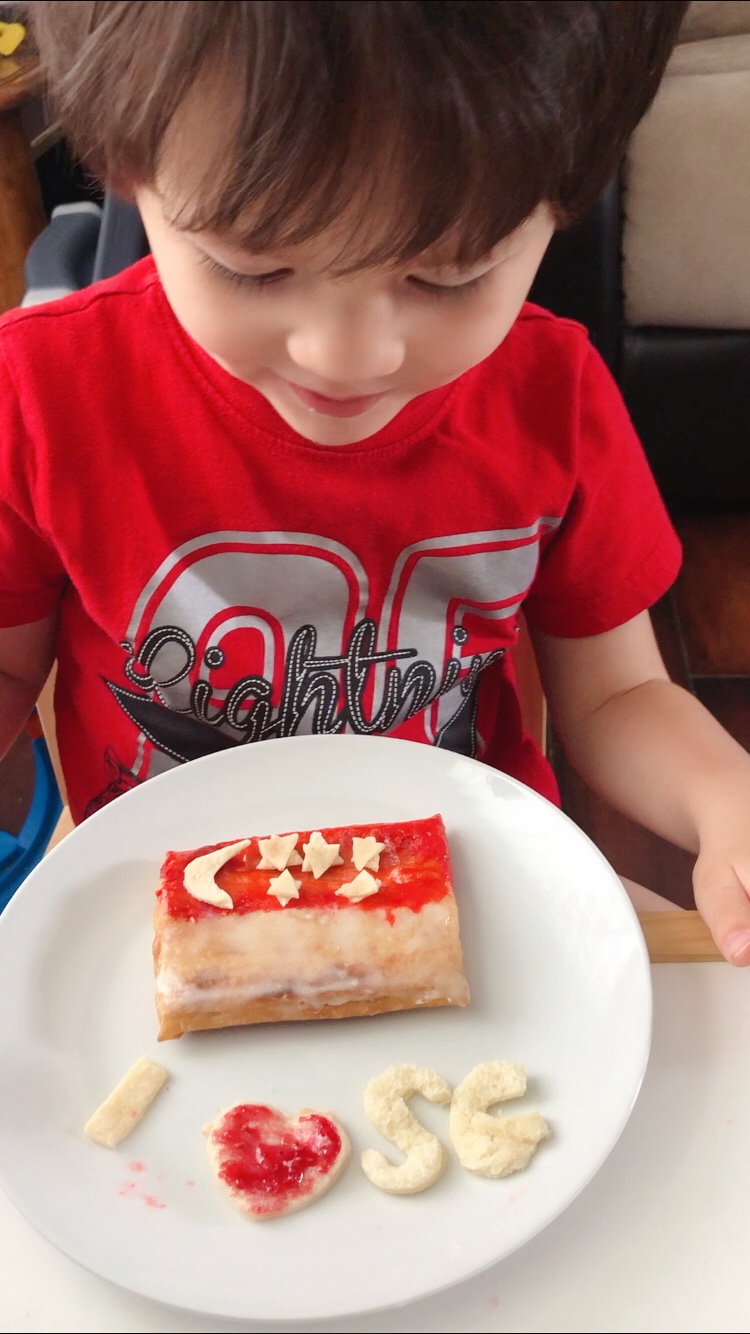
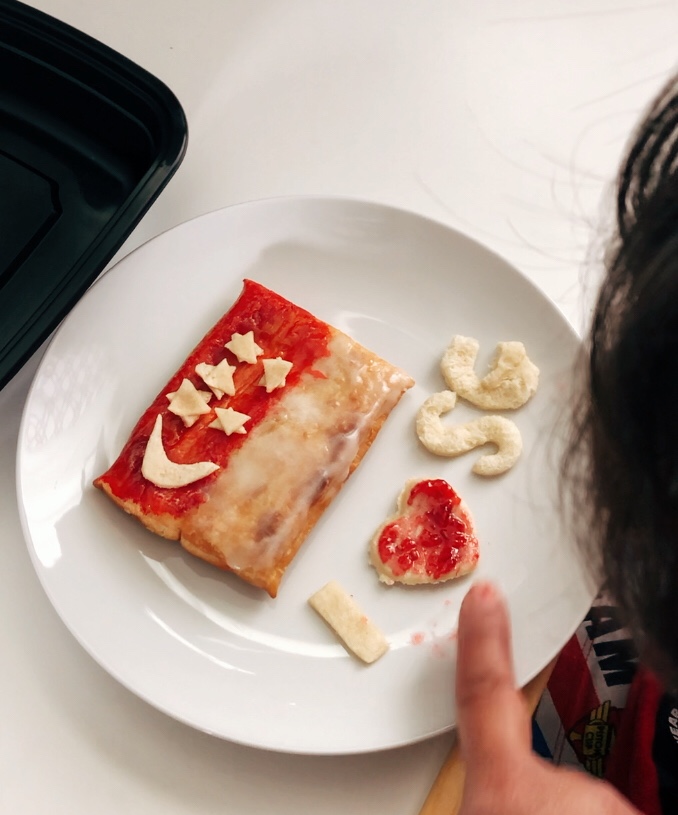
Here is my easy Peasy laZy mommy Singapore National Day Activity for Ryan.

Ingredients:

  • Pillsbury Strudel as the Flag
  • Store Bought Red Icing or Strawberry Jam
  • Store Bought White Icing
  • White Bread for the stars & crescent moon
  • Cookie Cutters to cut out “I Love SG”

There you go. An easy Peasy way for him to learn about the Singapore Flag.

And while Ryan was not born and didn’t grow up in Singapore like I did, it’s so important to me that I help him understand and get to know Singapore culture and traditions.

And while I get sad at times because all my family are in Singapore and I wish he could be there for his grandma birthday, his cousin birthday and every milestone of his Singapore family, I’m going to choose to focus on how lucky Ryan is that in spite of the long distance, so many people in Singapore adores & loves him, that he’s been flying since he was 5 months old and how lucky he is to be exposed to 2 awesome cultures – Canada & Singapore!

Easter Eggs Colouring with a Toddler

Never celebrated Easter before. Certainly have never colored Easter Eggs before either. If there is anything I have learnt from embarking my motherhood journey, it’s that there are so many things, songs, activities for kids here that are very different compared to if Ryan was growing up in Singapore. Sure, there are many similarities too but definitely a lot of differences as well. I think differences are great! They allow our kids to learn and be exposed to so many different experiences 😀

Back to Easter. Easter and Good Friday has never meant anything to me except they were statutory holidays. I sometimes worry if I would be a good mom because there are so many Canadian childhood rituals that wouldn’t make any sense to me. It wouldn’t be intuitive for me to create a Easter Egg hunt for Ryan & his buddies. Neither would it be intuitive for me to go Trick or Treat with Ryan on Halloween door to door or carve out a pumpkin lol. But my worries are unfounded, so far at least. If anything, it gives me the opportunity to be as excited as Ryan because it wouldn’t just be Ryan’s first time coloring eggs. It would be this Mommy’s first time too ❤ ❤ ❤ ❤ ❤ .

While we weren’t able to meet up with family for our usual Easter Dinner, we had fun and we are grateful that we are healthy and are all together. At the end, that’s all that really matters.

We hope you enjoy our little Ryan video of us coloring Easter Eggs for the first time & of course, HAPPY HAPPY EASTER TO EVERYONE! 😀

Making Play Dough with a Toddler

Honestly, the beginning of this weekend has been rough for me & maybe even for Ryan. He’s turning 3 soon & I didn’t realize till recently that if he is not potty trained by 3, his daycare can’t have him anymore. Not his daycare fault. His daycare is awesome! More of me not reading the handbook properly.

In any case, this marks the beginning of our weekend when I started him fully on potty training & mind you, I actually have displayed more patience than I thought I would. And I know that 1.5 days is hardly what anyone would call enough potty training & we will get there but what frustrates me is that as soon as I start, he holds his poop in and now he is constipated and unhappy.

I try my very best to not let him feel his mommy’s anxiety of worrying about him not having a daycare or a babysitter to go to if we can’t get him potty trained soon. I know this will pass just like all the other babies stuff but right at this moment, please dun tell me not to worry … I’m not worried that he will never be potty trained … I’m worried that we can’t get him trained within this short timeline.

In any case, this potty training thing & the fact that it was snowing today, I decided that he & I should play with Play Dough & what best way to play with it than to let him make it himself (for the most part) 😀 He had a great time making and playing with it 😀 I had so much fun playing it too with him that it was a great distraction from my worries 😀

There are many play dough recipes online. Some call for cooking & some call for using cream of tartar which I’m not entirely sure is that common an item in every regular household. The recipe I found uses neither.

  • No cooking required
  • No cream of tartar required
  • No matter how many colours you are planning to make, you can do all the different colours in one mixing bowl. We did 3 colours all in same bowl! Yup! You heard right. 2 less bowls for me to wash is a winner! 😀
  • So easy even my toddler can help with it. Only part he is not able to help as much is at the very very end when you just need to knead the dough together but otherwise, he could help with every step
  • It smells amazing
  • It is non toxic unlike the ones you buy in the store
  • And it is so much Fun for the kids 😀

So the ingredients you need are so so simple:

  • 1 cup of flour
  • 1/4 cup of salt
  • 1 packet of Kool-aid
  • 1/2 cup of hot water
  • 1 tbsp of cooking oil

Instructions are so so simple too:

  • Place all dry ingredients in a big mixing bowl. If your toddler is just starting out, get as big a bowl as u can find. Just makes for easier cleaning
  • Add oil and hot water
  • Use a spoon to mix it first
  • Once water cools down enough for your hands, knead it altogether into a dough. Took me less than 10 seconds cos that’s all you have with a busy toddler lol
  • If the dough still feels too sticky, add a bit more flour but otherwise, you should have a nice smelling play dough now
  • I bought 3 packets of Kool-aid with different flavours and I basically just got Ryan to start the same process again in the same mixing bowl
  • I took a portion from all 3 doughs for him to play and cling wrap the remaining and place it in fridge for the next time

We had a great time & we hope you enjoy our little video 😀

Easy Monster Cookie Decorating with a Toddler

I know I know 🙄 Halloween is still like a month away but all the stores in my town has already started displaying all their Halloween stuff so it’s difficult for me not to be excited about it 😀 we love Halloween! 😈 😈

I wanted Ryan to decorate some Halloween cookies together a couple weeks ago & usually, I will bake the cookies from scratch since I do enjoy baking but it was a busy weekend and honestly, he’s 2 years old. Anything he decorates right now probably is going to be messy so I really didn’t feel like baking cookies from scratch just to be totally messed up lol. So for mommies out there who wants a easier way, check out this easy Peasy Monster Cookies 😎 😎

Ingredients:

  • Store bought cookies (Mine was $1 shortbread from the Dollar Store)
  • Icing tubes of a few different colors
  • Candy Eyeballs (we had this at home but you could get them from Walmart or even some dollar stores)
  • Halloween soft candy (Didn’t end up using them at all so it’s optional)
  • Big Baking Tray (optional)
  • Commercial size aluminum foil (optional)

It’s pretty self explanatory from the pictures shown above. You could use other cookies shapes. I just chose the rectangular shortbread cookies so I can line them together so it is easier for him to decorate them. Bothe baking tray and aluminum foil is optional but they save me so much work in terms of cleaning up after. With a toddler, he’s gonna get icing all over the place. So I just use my biggest baking tray and foil. At the end, wrap the whole thing and dump it. Easy Peasy….the way this Lazy Mommy likes it. I rather use my cleaning time to play with him or relax and drink my coffee lol. That’s just me but to each their own 😀

Check out his video of decorating the cookies 😀 & share with us any other easy cookie decorating ideas!

Talk to you soon!

DIY Lemonade Stand

So I really wanted to learn to make a lemonade stand for Ryan. I found this DIY tutorial at Seevanessacraft.com and told our Papa Del to teach me how to do it. Of cos, I go to his place expecting a lesson from him but he’s already got it all done lol.

He says he left the screws slightly loose so I can tighten the screws myself LOL….like really, did he think that was what I asked him to teach me????? To tighten the screws? 🙄 🙄 🙄 🙄 🙄 🙄

Clearly he didn’t need to read my blog to know that I’m a lazy mom lol. Oh well, less work for this mama! 😎 😎

So now all this lazy mom has to do is to paint it 🤗🤗… Thanks again Papa Del!

So I wanted to use chalk paint for the top board so that it doesn’t just have to be a lemonade stand. It could be a cookie corner or just anything really. I didn’t however want to buy a pint of chalk paint so went to Vintage & Restoration Love to check out what they had.

The ladies there recommended me Fusion Mineral paint in Homestead Blue. While it wasn’t chalk paint, they gave me tips on a chalk treatment that will allow us to use chalk on it.

& TAH DA! This is how it looks like now. If you have any ideas on how I can decorate this further, please share with me 🙂

I am not a DIY person but I really want to learn doing simple stuff. And using the Fusion paint was really easy peasy & so was the chalk treatment the ladies recommended. Didn’t do a video when I painted it but it was really easy. I just added like 1/2 tsp of water to it and painted 2 coats of it and let it dry.

The video was more of the easy chalk treatment that they taught me. Honestly, I love how it looks after the chalk treatment. By doing this step, I can now use chalk to draw anything I like on the top board and it will be super easy to clean just like a regular chalk board. Yeah!!

LAZY MOMMY GUIDE

WHEN LIFE GIVES YOU LEMONS, BAKE...

The Gastronomy Gal

all things food and nutrition

Your Home for Homemade Japanese Food

How to cook "with visual instructions" "using familiar ingredients from your local grocery stores" healthy, traditional and delicious Japanese dishes!!

mumsinreallifecouk.wordpress.com/

Just two mums, sharing our experiences

In Dianes Kitchen

Recipes showing step by step directions with pictures and a printable recipe card.

BeautyBeyondBones

Because we’re all recovering from something.

Smitha's Bake Love

Let's bake Simple & Healthy from your Pantry !!!

ice cream magazines

................... for lovers of ice cream. Your free on line magazine for sweet frozen treats. Recipes, inspiration, artisanal ideas for your delectation.

YummyHood

Welcome to the YummyHood!

Cooking Without Limits

Food Photography & Recipes

Discover WordPress

A daily selection of the best content published on WordPress, collected for you by humans who love to read.

Nuts And Bolts

The Basic How-to's

@myfoodswings

Different moods, Different foods :)