Roll prepared dough out on a clean floured surface
Spread melted butter all over the rolled out dough
Sprinkle generously the brown sugar all over
Tightly roll dough up. I cut away the two corner sides
Slice them into 6 rolls
Place cinnamon rolls in a greased baking pan. (I use a square pan)
Cover with towel and let rise again for 60 mins
Preheat oven to 350 degrees F. Remove towel and bake cinnamon rolls for 20-25 minutes or until just slightly golden brown on the edges. Mine took 20 minutes. You want to underbake them a little so they stay soft in the middle, that’s why we want them just slightly golden brown
I have never like frosting on my Cinnamon Buns so this is good enough for me and my family
While waiting for the dough to rise, I thought why not use part of the dough to bake something else and see if it works out & Ta Da! That’s how these Cinnamon Buns were born as well 😀
But meanwhile, let’s take a look at how these Easy Peasy Dinner Rolls are made 😀
Ingredients:
2 cups warm milk
2 tablespoons instant dry yeast
1/4 cup white sugar
1 teaspoons salt
6 tablespoons salted butter softened
2 large eggs
6 cups all-purpose flour
1 tablespoon melted butter to brush the buns after they are out of oven
Instructions:
In my mixer bowl with a dough hook, dump warm milk, yeast, sugar, salt, butter, and eggs in this order
Add in 6 cups of flour, turn mixer on to a low speed. Once the flour starts to incorporate into the dough, increase to medium speed
Mix until the dough pulls away from the sides of the bowl. The dough mixture should be slightly sticky and soft
Add more or less flour until the dough reaches the desired consistency. I find 6 cups work perfect for me
Transfer the dough to a lightly greased big mixing bowl. Cover with a towel and let rise 90 minutes
Do a happy dance when you see it rise after 90 minutes 😀
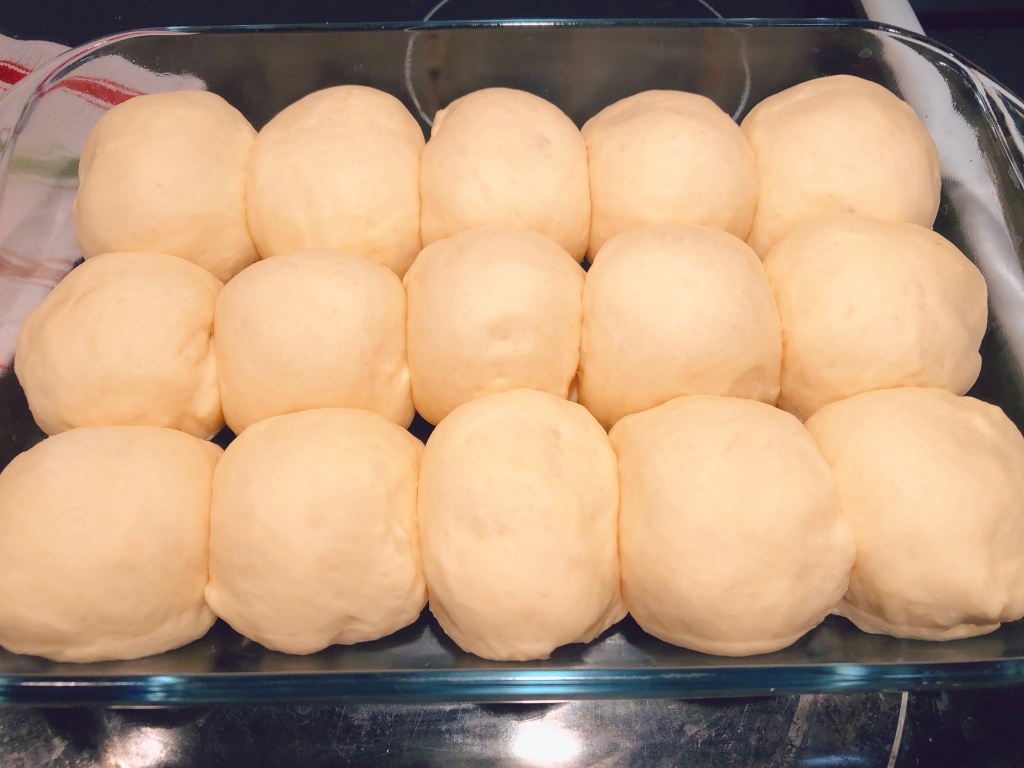
Punch down the dough and form into 15 equal sized rolls. You can use a food scale but I just estimate it by feel
Place on a greased baking tray with space between each roll. Cover and let rise 1 hour
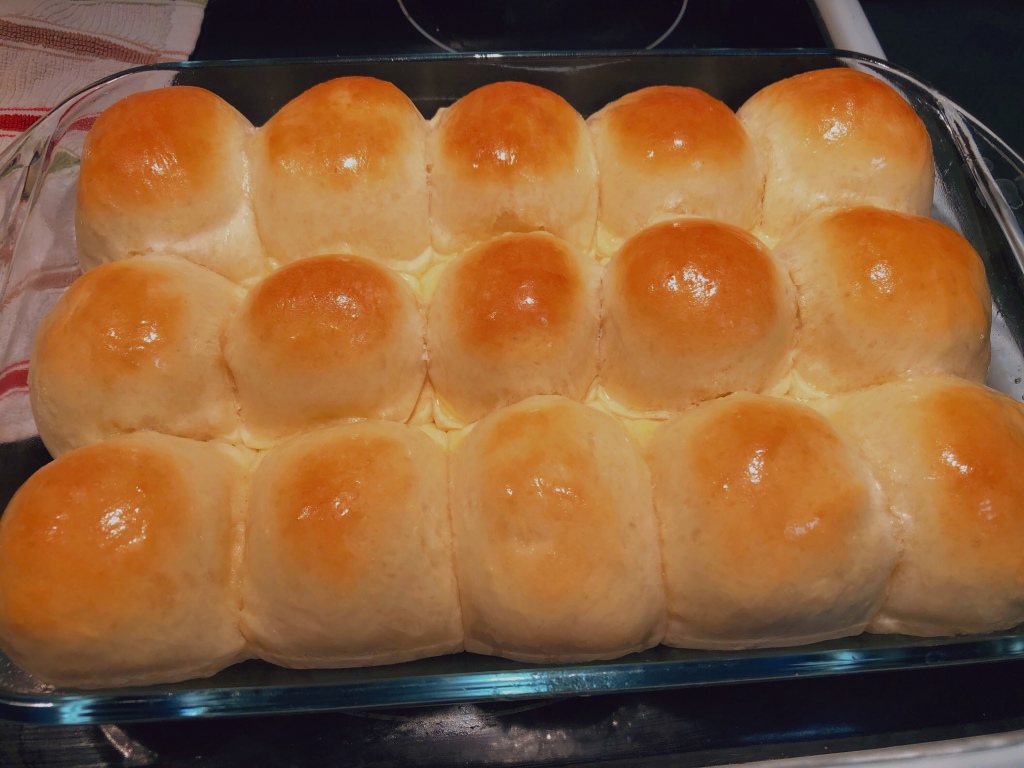
Preheat oven to 375 degrees. Bake the rolls for 12 to 14 minutes, until lightly browned.
Remove rolls from oven and brush with melted butter. Serve the rolls warm or if you are making them the night before like I was, let them cool down first before storing in a zip lock bag
NOTES:
This recipe easily makes 24 rolls but I saved a portion of the dough to make Cinnamon Buns so I only made 15 rolls but if you plan to use the whole dough, divide them into 24 rolls. If you are interested in the Cinnamon Bun recipe, you can click them here
I made this the night before our Thanksgiving Dinner & just make sure the buns get cooled down before storing it in a ziplock bag
Dinner rolls always taste best when they are warm and fresh out from oven but sometimes, it isn’t possible to bake them just before the big dinner so no worry. They taste good on its own the next day or microwave it for 5-10 seconds before you eat them and they are good 😀
We love meatballs! No doubt about that so when I was thinking on how to incorporate more veggies in our meals (because this family just really loves munching on salads & feeling like a rabbit lol), it just make so much sense to make meatballs with lots of veggies.
And it’s perfect for crunch time since these meatballs freeze so well. I usually make a huge batch on weekend and use it on really busy weekday evenings that I don’t have enough time to make our dinner from scratch.
Use it to make spaghetti with meatballs or make a meatball sub. Really, whatever u can think of will work with these babies 😀
Now, my recipe might incorporate veggies but if you practice clean eating, this probably isn’t the recipe for you but if like me, you want a somewhat healthier meatballs but still wanna do it the Lazy Mommy way, then u might like this recipe!
So it really is as easy as it can be.
Ingredients:
2 packs of Ground Turkey
2 Eggs
Panko Crumbs
Shredded Veggies (I use 1 medium Zucchini and threw a bit of carrot I still had in the fridge)
2 packets Onion Soup mix
Yes! You read that right! 😀
Like I said earlier, this recipe isn’t for you if you want super clean eating and no sodium.
I just mix everything together. With any kind of meatballs, you never want to over mix or the texture of the cooked meatballs will be pretty yucky.
Bake in preheated 400 degree for 25 mins. If you like small meatballs, reduce it to 20 mins
There you go – this Lazy Mommy Easy Peasy meatballs 😀
I know I know 🙄 Halloween is still like a month away but all the stores in my town has already started displaying all their Halloween stuff so it’s difficult for me not to be excited about it 😀 we love Halloween! 😈 😈
I wanted Ryan to decorate some Halloween cookies together a couple weeks ago & usually, I will bake the cookies from scratch since I do enjoy baking but it was a busy weekend and honestly, he’s 2 years old. Anything he decorates right now probably is going to be messy so I really didn’t feel like baking cookies from scratch just to be totally messed up lol. So for mommies out there who wants a easier way, check out this easy Peasy Monster Cookies 😎 😎
Ingredients:
Store bought cookies (Mine was $1 shortbread from the Dollar Store)
Icing tubes of a few different colors
Candy Eyeballs (we had this at home but you could get them from Walmart or even some dollar stores)
Halloween soft candy (Didn’t end up using them at all so it’s optional)
Big Baking Tray (optional)
Commercial size aluminum foil (optional)
It’s pretty self explanatory from the pictures shown above. You could use other cookies shapes. I just chose the rectangular shortbread cookies so I can line them together so it is easier for him to decorate them. Bothe baking tray and aluminum foil is optional but they save me so much work in terms of cleaning up after. With a toddler, he’s gonna get icing all over the place. So I just use my biggest baking tray and foil. At the end, wrap the whole thing and dump it. Easy Peasy….the way this Lazy Mommy likes it. I rather use my cleaning time to play with him or relax and drink my coffee lol. That’s just me but to each their own 😀
Check out his video of decorating the cookies 😀 & share with us any other easy cookie decorating ideas!
Egg Plant is not unfamiliar to me. Actually in Asia, we call them Brinjal and my UK friends call them Aubergine. Either way, they are all the same thing 😀
In Asia when I grew up in, my mom cooked egg plant quite a fair bit but I have never liked it. It was like a stew kinda egg plant dish. My first few memories of the dish is that it is mushy and looks gross lol
But by chance through Ryan’s babysitter, she told me about this egg plant recipe and boy do I love it. I mean what is there not to love about it?
It’s delicious
It’s healthy
Ryan loves it
And it’s so easy to make
I first made this dish when Ryan was like 12 months old. If you making it for a younger baby, you could increase the baking time to make it even softer but with Ryan past 2 years old now, baking it at 350 for 25 minutes makes it soft enough but not so mushy that Ryan can still pick it up like a piece of pizza
There are other versions of making this dish that involves baking the egg plant once first before baking it a 2nd time with the sauce and cheese. This mommy just wants to minimize the cooking time as much as possible so here goes 😀
Last week after what I felt was a typical hair color done at a salon, I developed an allergic reaction to the hair color. My scalp felt like it was burning and it was itching so god damn bad. I felt like pulling my hair out.
It was the weekend. No doctors for me to see. I thought about using a mix of vinegar and water for the scalp but it suddenly crossed my mind that I still had the small little bottles of Young Living Essential Oils that my girlfriend sent me. I know without googling that the Peppermint one might be helpful lol. Honestly I think I just assumed peppermint would be useful because doesn’t all scalp shampoos smell like peppermint?? 😀
So I texted my girlfriend and thank god, she gave me this DIY easy peasy solution & basically, it is a mix of coconut oil, Young Living Peppermint Oil & Young Living Lemongrass oil.
According to my friend, Peppermint Oil helps with inflammation & Lemongrass Oil helps with healing so there u go. Thanks Elaine so I didn’t have to pull my hair out.
So before I explain what Nasi Lemak is, I want to explain why I have never attempted to cook this even though I could have googled a long time ago on the recipe. Like Singapore Chicken Rice, this is a dish that has more than 1 component. It’s not like Beef Stroganoff or Cabbage Rice Soup where there is just 1 main dish. With Nasi Lemak, the rice and the fried chicken feels like the most important components for me. Yes. There are other components but since I don’t have most of the ingredients here, I’m just going to focus on the rice and the fried chicken that makes up this famous Singapore dish.
So my challenge today is to be able to replicate Nasi Lemak with using just 1 Instant Pot. And I succeeded! 😀
So now, let me tell you what is Nasi Lemak. Wikipedia states that Nasi Lemak is a Malay fragrant rice dish cooked in coconut milk and pandan leaves (also called Screw Pine Leaves). It is a very popular Southeast Asia dish and you can find it everywhere in Malaysia and Singapore.
My Western friends and hubby will find this part strange but to us, this is a dish that can be served as breakfast, lunch or dinner. Because it is so popular, you can find many variations of the dish but it is always rice cooked in coconut milk and pandan leaves and it is usually always accompanied by a no. of smaller side dishes like fried chicken (Ayam Goreng), deep fried anchovies, peanuts, fried egg, sliced cucumber and sambal chilli
If you are in Singapore and wishes to try Nasi Lemak, you can find them everywhere. But if you want to know where the Top 10 Best Nasi Lemak is in Singapore, check out the list at Singapore Foodie 😀
Some Notes About This Recipe:
Obviously, given the restraints I have in terms of grocery shopping in my town, I am not going to be able to replicate the dish and its side dishes 100%
I wanted to make fried Chicken as in Ayam Goreng but I don’t want to have to deep fry so this is a very easy peasy version and is not going to taste like Ayam Goreng but honestly, I was pretty happy with how the chicken turned out. My toddler and hubby loves it
Whole concept of Instant Pot is using just 1 pot so you can see in my video that other than broiling the chicken in oven for 5 mins, everything was done in Instant Pot
I cooked the chicken in Instant Pot with just water. But after cooking, the water now has a lot of juice and fats from the chicken dripping onto them so make sure you drain all that liquid before you cook your rice. Needless to say – please dispose the liquid safely and not down your sink. I feel like everyone should know this lol but since I can be considered quite ditsy at times (more times than not), I figured let’s not assume everyone has common sense cos this Lazy Mommy doesn’t lol 😀
Because I use only coconut milk with the rice, I find that I need more salt than most coconut rice recipe. I estimate I used about 1/2 tsp and slightly more. If you are concerned about sodium, add the salt after rice is cooked so you can tailor to your taste buds
I can’t tell you how happy it makes me to not only be able to replicate our traditional Singapore dishes for my baby but also to see his happiness and joy at trying and liking these dishes. I really hope he grows up being a proud Canadian but also remembering his Singapore roots 😀
Is that too much for a Lazy Mommy to wish for? 😀
Instant Pot Nasi Lemak (Coconut Milk Rice)
Ingredients
1 Tsp Puree Ginger
2 Tsp Puree Garlic
1/2 Tsp Puree Turmeric
2 Tbsp Dark Soy Sauce
1 Tbsp Light Soy Sauce
1 Tbsp Oyster Flavored Sauce
A dash of Sesame Oil
1 Tsp Sugar
Chicken Thighs
2 Cups Basmati Rice (Rinsed and drained)
3 Cups Coconut Milk
1/2 Tsp Salt
2 Tsp Puree Garlic
Directions
Add the first 8 ingredients together & marinate chicken in it for 1 few hours. Better overnight
Add to Instant Pot on the trivet with 1 cup water
Close lid, ensure vent valve is sealed and select Pressure Cook for 15 minutes. Once done, Natural Release 10 minutes before Quick Release
Place chicken on greased baking tray and Broil on High for 5 minutes
Drain the Instant Pot of the liquid (There is chicken oil so dispose of it safely and not down the sink)
Add rice, coconut milk, salt and puree garlic in pot. Give it a good mix
Close lid, ensure vent valve is sealed and select Pressure Cook for 5 minutes. Once done, Natural Release 10 minutes before Quick Release
Disclaimer: This is not a sponsored post. The Young Living Essential oils were sent to me as a personal gift from a girlfriend. I receive no compensation from this review. Please always use caution when using essential oils, and always ask the advice of a professional. All content is based on my personal experiences of a Lazy Mommy and purely for informational & entertainment purposes and should not be relied on as professional advice.
Okay. Confession of the day – I don’t use Essential Oil much. Other than the cheapo Thieves Oil and Tea Tree Oil that I buy to sanitize my house after a bout of illnesses, I really have never cared much for Essential Oil. So when a friend of mine told me that you could bake with Essential Oils, I was pretty skeptical. I mean why use Lemon Essential Oil when I can use Lemon Zest. But I’m always up to the challenge and when a girlfriend offered to send me some to try, there was no way i could have turned it down 😀
Thanks Elaine!
Being the typical cynic though (a typical Virgo trait lol), I set out to read and read online about Essential Oils. I had heard a lot about Young Living but hey, I wasn’t just about to trust on face value from their website. I mean which company would say their products suck on their own website? LOL.
So the CFA (Canadian Federation of Aromatherapists) actually recently just released a safety statement regarding essential oil usage. You can read the whole safety statement here. But to summarize for you,
Health Canada does not:
recommend internal uses of essential oils as a stand-alone product. What that just means is you should not be consuming a edible grapefruit essential oil by itself as if you are drinking water. Adding 2 drops to a cake mix is fine.
Now,I will never claim to be an expert after researching it online but KEY TAKEAWAYS for me after the online research says to me the following:
Never use essential oils without diluting them
A small amount of edible essential oil can make a huge impact on flavor in any dish. Essential oils are potent. I recommend using only 1-2 drops at first, or even the toothpick method when cooking with essential oils: Stick a toothpick through the oil dropper to absorb the oil, then swirl the toothpick through wet ingredients. Give it a taste and gradually add more flavor to your liking
Never consume essential oil on its own. Instead, use 1 to 2 drops of edible essential oil on a recipe
Essential oils can be great substitutes for fresh herbs, citrus zest and juice, and spices such as oregano, lime juice, or ground clove.
Not all essential oils can be used in cooking or baking
Just like I would inform someone that I have nuts in my cupcakes (just in case that someone has a nut allergy), it just makes common sense to me to let someone know you used essential oil in your baking. When I brought my grapefruit cupcakes to work, I told everyone it was made with 1-2 drops of grapefruit essential oil. No one had an issue and they ate it happily.
Always follow the label instructions and never exceed the amount suggested.
Always keep out of reach of children.
If you are pregnant, nursing, taking medication, or have a medical condition, consult a health professional prior to use.
OKAY Now with all the boring part out of the way, I am wracking my brain on what to bake. I bake so many things with lemon zest and i always have lemons at home so I wanted to try something i typically wouldn’t have at home so I chose to bake with their Grapefruit Essential Oil.
YOUNG LIVING GRAPEFRUIT ESSENTIAL OIL (VITALITY SERIES)
I DO NOT LIKE to eat grapefruits on its own. Tried it once in my 20s when i was on a diet and Yucky 😦 . But I have always loved tasting grapefruit as part of a recipe. Although i love grapefruit flavored baking, I never have any grapefruits at all cos they would just all get rotten before I remember to use them, a Grapefruit essential oil might be this Lazy Mommy’s solution 😀
It was a Saturday. I have a bazillion things to do so am using a cake mix so it is easier to bake with Ryan.
#noshame #lol #dunjudge #whatever
So What’s my Verdict on Young Living?
I used the Grapefruit essential oil on both the batter and the frosting – 2 drops on each. Everyone likes it. While I probably will still use Lemon zest (as I have many lemons at home lol), I totally would use edible essential oils for ingredients that I don’t always have at home I already can think of a few that is making me super excited 😀 – Lemongrass, Lavender, Orange, Peppermint, Basil and Cardamon.
I really like it that Young Living makes it a breeze in helping you know which essential oil can be used in cooking and baking – their Vitality series. Their Vitality series of essential oil are specifically labeled for internal use with directions on how to do so safely. Vitality line is Young Living offering of essential oils that are safe for ingestion when label directions are followed.
I used to think that Essential Oil brands were all the same so I am really surprised at the strict quality control and standards Young Living set for their products. Not all essential oils are created equally. Young Living stand by their process of sourcing products from carefully vetted corporate-owned farms, partner farms, and Seed to Seal-certified suppliers and testing them extensively.
Singapore Chicken Rice – a humble dish created out of wanting to stretch the use of the chicken as much as one can. I’m sure that when the dish was created years & years ago, it never thought it will become one of Singapore National dish that is eaten all over the world…oh well, except in my part of the world where no other Singaporeans reside lol
According to David Farley’s article, Chicken Rice from Maxwell Food Centre in Singapore was worth him flying 15 hours from New York to come eat it. And get this, Chicken Rice is sold in many places in New York. David specifically flew to Singapore and went to Maxwell Food Centre to eat at 30-year-old food stall Tian Tian, a spot renowned for its Singapore chicken rice that has gotten praise from even the likes of Anthony Bourdain and Gordon Ramsay.
Chicken Rice can be found ANYWHERE in Singapore. Not kidding. We love this dish so much. I can eat it 2-3 times a week. But while you can find it everywhere, there are only a selected few places that have made the top in not just my mind but in every Singaporean’s too. There would be a chicken rice place within 5 mins walking distance from where I live but I would have no qualms traveling all the way for 45 mins or more to another chicken rice place to join a insane long line just to eat what I feel is a better chicken rice version. My hubby often jokes that to get a Singaporean to love a food, just create a long line as a marketing strategy. He’s not exactly wrong LOL. We will line up to get good food but we are also very good at sussing out the bad places lol.
So now let’s talk about making it in the Instant Pot. I first saw the Instant Pot recipe on pressurecookrecipes.com and I was hooked. I really wanted to make it but felt it was too much steps for my tiny brain. So I thought maybe I could adapt it to make it simpler for me. I’m 100% positive theirs taste better but for the convenience and time saved for me, I am happy to compromise with what I feel is still a pretty ok recipe. It will never top my Favorite Chicken Rice in Singapore but it’ll do; my craving is satisfied & Ryan gets to experience his Singapore culture 😀 . That’s all that matters to me. I was worried Ryan wouldn’t like it but he LOVES it!!!
So Some Things About This Recipe:
This is a very humble Singapore dish but one that every Singaporean loves and is proud of. But not all my Canada friends would appreciate the white pale chicken that is fundamental to this dish. My hubby is one of them. So instead of needing to cook a separate dish for him, I just brush BBQ sauce on 2 of the chicken legs and broil them on High in oven for 10 mins and he gets BBQ Chicken Legs and we get our traditional chicken
I love using frozen chicken but ALWAYS make sure you separate the chicken pieces first before placing in pot. Either leave it out to thaw for a bit which is way too troublesome for me or defrost it in microwave for 10 mins. Chicken will still be frozen but you can now separate the pieces
The original recipe from Pressurecookrecipes.com has more steps than my recipe but I definitely took my inspiration from their recipe and I am 100% certain theirs must taste better than mine but I am not picky. I always think that any food that is made with love and patience always taste better and I have Love but definitely not the Patience LOL. I am honestly though quite happy with the results of my adapted recipe so this will work for my family but if you want an even better result, I suggest you follow the original recipe as I definitely took a lot of shortcuts. Thanks Amy & Jacky at Pressurecookrecipes.com!! 😀
Condiments are very important to us in eating this dish. I only had dark soy sauce so that’s all I used. But the original Singapore Chicken rice is served with freshly minced chilli sauce, garlic and ginger. I didn’t have all the above so dark soy sauce will have to do
While the chicken is an important part of the dish, the rice is really of the essence. That’s where the seasoning mix and that broth comes in. If you want to be even more lazy, use campbell chicken broth but for the rice to have that fragrance, oil from the chicken is important. Thus, cooking the rice with the broth that was used to steam the chicken helps make the rice so much nicer than using Campbell. While the chicken gets cooked, the chicken fat drips into the water in the pot making it the perfect rich chicken broth to cook the rice in.
I use puree for the seasoning mix but feel free to use fresh
4 Frozen Bone In Chicken Legs (Separate them first)
3 Cups Water
3 Cups Jasmine Rice (Better to wash & rinse them once but i didn’t)
Seasoning Mix: 4 Tbsp Puree Ginger/10 Cloves Puree Garlic/1 Puree Shallot/1 Tbsp Olive Oil (Puree them or just use store bought puree products)
Dark Soy Sauce as condiment
Sliced Cucumbers and Sliced Tomatoes as garnish
Directions
Add all 4 frozen chicken legs in pot & add 3 Cups water
Close lid & ensure vent valve is in sealing position. Select Pressure Cook for 25 minutes. Once it is done, do a Quick Release
Once all pressure is released, open lid
Plunge all 4 chicken legs into a ice cold water bath immediately to firm up skin & stop it from cooking further. Lay chicken aside
Pour the broth from Instant Pot to a measuring cup. It came to about 4 cups of broth
Add Rice to pot. Add 3 Cups of that rich chicken broth from Step 5 into pot
Add the Seasoning Mix in pot and make sure you give it a good mix so the rice gets mixed well with the seasoning mix, as well as that rich juicy chicken broth
Close lid & ensure vent valve is in sealing position. Select Pressure Cook for 5 minutes. Once it is done, wait for 10 mins. Once 10 mins is up, press Cancel
Once all pressure is released, open lid & fluff rice with fork
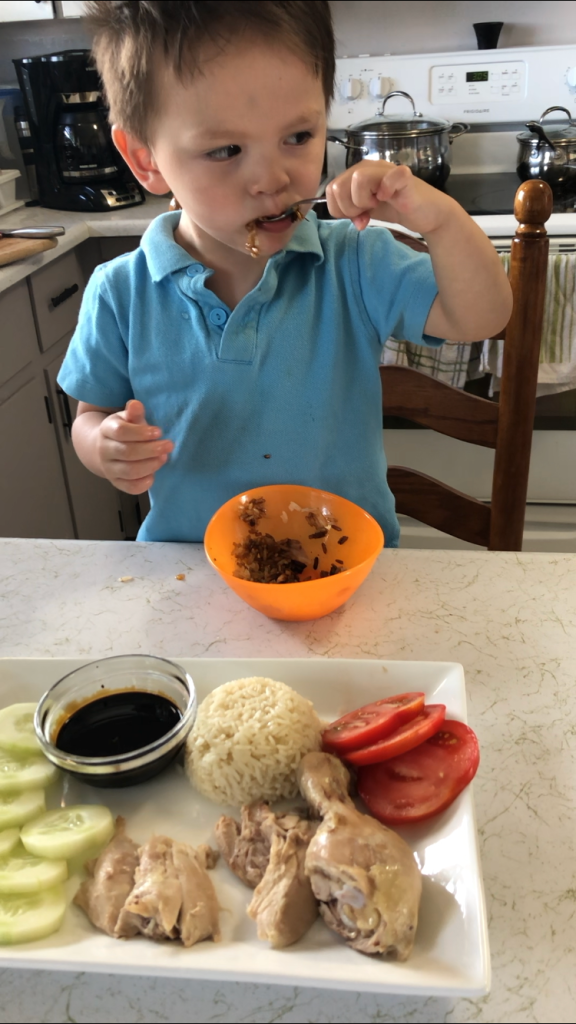
Lay your rice along with the chicken, dark soya sauce, sliced cucumbers & tomatoes & enjoy while it’s hot
NOTE: Not everyone likes chicken the Singapore Chicken Rice way. Singaporeans love it but my hubby wouldn’t like eating pale white chicken lol. So best part – I used 2 chicken for Ryan & me and broil the remaining 2 chicken legs in oven brushed with BBQ sauce on HIGH for 10 minutes and TAH DA…now everyone is happy
Enjoy and I hope you like it as much as Ryan and I did 😀
I confess that I actually do not like Dill Pickle all that much. I mean I like it as part of a bigger dish like in tuna or in potato egg salad but I have never liked to eat an actual dill pickle. Growing up in Singapore, Dill Pickle really hasn’t been something we have been exposed to.
It was actually just maybe a couple months ago that I by chance tried Dill Pickle Wings & I’m like OMG OMG OMG like where has Dill Pickle Wings been all MY LIFE lol….
Instant Pot Dill Pickle Wings
So ever since then, I have been looking online for recipes but every recipe I found has more steps than this Lazy Mommy wants to do. Bummer.
I thought about the Instant Pot. I have made wings a few times in the Instant Pot so I’m fairly comfortable but so far, my Instant Pot Wings have never required marination ahead not time.
I did try making it in my Instant Pot a few weeks ago using my usual method of cooking wings and without marinating it ahead of time. Sadly, it was a FLOP. It was good wings but it wasn’t Dill Pickle wings.
Decided to try again this last weekend. What changed was that I took the extra step to marinate the wings in Dill Pickle Juice for 8 hours. It definitely worked better than the last time but I still feel the pickle taste is not strong enough for me so I highly suggest marinating it overnight for the taste to be even stronger. Still really yummy wings & Chef Ryan approves it too 👌🏻👌🏻. Goes really great with Ranch dip or dressing.
Instant Pot Dill Pickle Wings - Lazy Mommy Version
How to cook "with visual instructions" "using familiar ingredients from your local grocery stores" healthy, traditional and delicious Japanese dishes!!
................... for lovers of ice cream. Your free on line magazine for sweet frozen treats. Recipes, inspiration, artisanal ideas for your delectation.